
Single-phase fight with a cycle of roughly 1 minute 45 that repeats, closed each time by an intermission. It's the only pure single-target fight in the raid, and the difficulty comes from having to execute the cycle's mechanics in parallel.
On Mythic the signature mechanic is rage. On pull the player furthest from the boss receives a mark; the boss builds rage over time and at 100 enters an enrage equivalent to a wipe. The only way to clear it is to gather at least 14 players within 8 yards of the marked player: at that point the boss charges into them and consumes all its rage. Everyone who took part in the soak receives a debuff that spreads on contact, so an immediate spread is needed right after. On Heroic the mechanic is absent.
The rest of the cycle has three elements. A tank combo with two alternating frontals, one the tank eats alone and one that needs at least five soakers, with the two tanks unable to take the same ability twice in a row. Vortices that bounce around the arena and accelerate when they hit the edge, to be dodged because they slow cumulatively. And a debuff that flings players in fixed directions, cancelled by pairing with whoever has the opposite direction.
The intermission comes at around 1:45. The boss anchors itself and takes +30% damage, which is the burst window, while three consecutive gales try to push the raid off the platform. Each gale starts from a specific side of the arena and pushes toward the opposite one. It is cancelled by placing a toxin in advance on the side the gale comes from: whoever detonates it is anchored to the ground and doesn't get moved.
The order of the three gales can be read at the pull. As soon as you engage, vortices appear beyond the edge of the platform, clustered behind the world markers, never at the entrance and never at the exit. The number of vortices behind a marker tells you when the gale from that side will arrive: one vortex means first gale, two means second, three means third. Counting them gives you the full sequence over a minute in advance, so toxins can be dropped on the right markers instead of improvising mid-intermission.
TL;DR
What to do
Everyone
- On pull: count the vortices appearing beyond the edge behind each world marker. One vortex = first gale, two = second, three = third, and the gale pushes from that marker toward the opposite side. This tells you where the toxins go.
- Every cycle: group 14 players within 8 yards of the marked player to reset rage, then spread immediately.
- Every cycle: one group soaks Mutilate 1, the other Mutilate 2. At least 5 players per soak.
- Every cycle: pair with the opposite direction during Raging Crosswinds.
- Always: avoid the Tempests, which slow cumulatively.
Tank
- Every combo: alternate abilities; neither tank can take the same one twice in a row.
- Ravage: the tank eats it alone, facing away from the raid.
- Mutilate: the tank turns toward the matching soak group.
- Tank swap on
 Corroding Venom.
Healer
- Always:
 Ula'tek's Presence deals damage every 2 seconds for the entire fight. Constant attrition.
 - Every Mutilate: the group hit receives
 Mutilated Gash, a DoT split among those struck.
 - Intermission: pushbacks and toxin detonations concentrate damage into a few seconds.
DPS
- Intermission: all cooldowns and Bloodlust go on
 Dig In, when the boss takes +30% damage.
 - Every cycle: baiters place toxins on the called markers, opposite the assigned pushback.
What can kill you
| Ability | When | How to avoid it |
|---|---|---|
 Ravage Ravage | Tank combo | Hits everyone in the cone and grants +600% Ravage damage taken per stack: raid stays clear |
| Mutilated Gash | After each Mutilate | +500% Mutilate damage taken: never two consecutive Mutilates on the same person |
 Tempest Tempest | Combo interruption | Bouncing vortices that accelerate off the edges, −30% movement stacking |
 Raging Crosswinds Raging Crosswinds | Every cycle | Without pairing you fly off the platform |
 Viscous Cyst Viscous Cyst | After Venomous Surge | Explodes on contact, knocking everyone back: mind where you walk |
 Caustic Residue Caustic Residue | After Caustic Claws | +30% damage taken while standing in it |
What wipes the raid
| Mistake | When | Consequence |
|---|---|---|
| Rage reaches 100 | Any time |  Unbound Ferocity: +500% damage, +50% attack speed. Effectively a wipe Unbound Ferocity: +500% damage, +50% attack speed. Effectively a wipe |
| Mutilate with fewer than 5 players | Tank combo | Deals lethal damage |
| Missed rage reset | Every cycle | 14 players don't group in time and rage keeps building |
| Missing toxin for a pushback | Intermission | The raid is blown off the platform |
| Two consecutive Ravages on one tank | Tank combo | Unmanageable +600% stacks |
Timeline
| Point | What happens |
|---|---|
| Pull | Serpent's Fury mark on the furthest player. Vortices appear, showing the pushback order |
| Cycle | Tank combo (Mutilate 1, Tempest, Mutilate 2, Ravage) · Venomous Surge with toxin baiting · rage reset · Raging Crosswinds |
| ~1:45 | Intermission: Dig In (+30% damage taken, 20-25 seconds) plus three Howling Maelstrom pushbacks, cancelled by the toxins |
| End of intermission | Detonate the spare toxin, then the cycle repeats identically |
Rage builds in parallel throughout and must be reset each cycle.
Was this summary useful?
Detail
The pull
Two things happen simultaneously on pull, and both must be registered immediately.
The  Serpent's Fury mark. The player furthest from the boss receives the mark, also visible on the raid frame. It isn't random: it's distance-based, so designate a fixed person who positions furthest out on pull.
The vortices beyond the edge. The number of vortices behind each world marker indicates the order of the intermission pushbacks.
| Vortices | Marker | Pushback |
|---|---|---|
| 1 | Diamond | 1st — from Diamond toward Circle |
| 2 | Triangle | 2nd — from Triangle toward Square |
| 3 | Cross | 3rd — from Cross toward Star |
Counting on pull gives you the exact order more than a minute in advance, so toxins can be placed without improvising. Assign someone to count and call them out.
Room references. The arena is octagonal, with the exit to the north and the entrance to the south. World markers are placed as follows:
| Position | Marker | Position | Marker | |
|---|---|---|---|---|
| North | Skull | East | Moon | |
| North-west | Star | South-west | Diamond | |
| North-east | Square | South-east | Triangle | |
| West | Orange circle | South | Cross |
Base positioning: the boss is tanked in the southern sector, between the Cross and the entrance, with G1 west and G2 east.
Rage (Mythic)
Sszorak marks a player and gains rage over time. At 100 it enters Unbound Ferocity: +500% damage and +50% attack speed until the raid is wiped.
The only reset requires at least 14 players within 8 yards of the marked player. When the condition is met, Sszorak casts  To the Slaughter: it charges the marked player, consumes all rage and applies
  Virulence to those struck.
On removal, Virulence bursts and spreads to nearby players: spread immediately after the reset.
In PTR testing resets happened at 85-87 rage. There's no benefit to pushing it. The marked role should go to a reliable player.
Toxins —  Venomous Surge
Several players get a circle underfoot. On expiry the venom detonates with raid damage that falls off with distance, and a Viscous Cyst forms at the player's location.
The cyst lasts 2 minutes. On contact or expiry it explodes, knocking away those present, and the toxin clings to players making them adhere better to the ground. That adhesion is what neutralises the gale.
Toxins must be placed on the side opposite the pushback direction. If the second pushback goes from Triangle toward Square, the toxin that cancels it goes on the Triangle.
They arrive in two sets of two, so 4 toxins against 3 pushbacks: one spare, which is your margin for error. The last one must still be detonated after the intermission; the knockback can be used to reposition quickly.
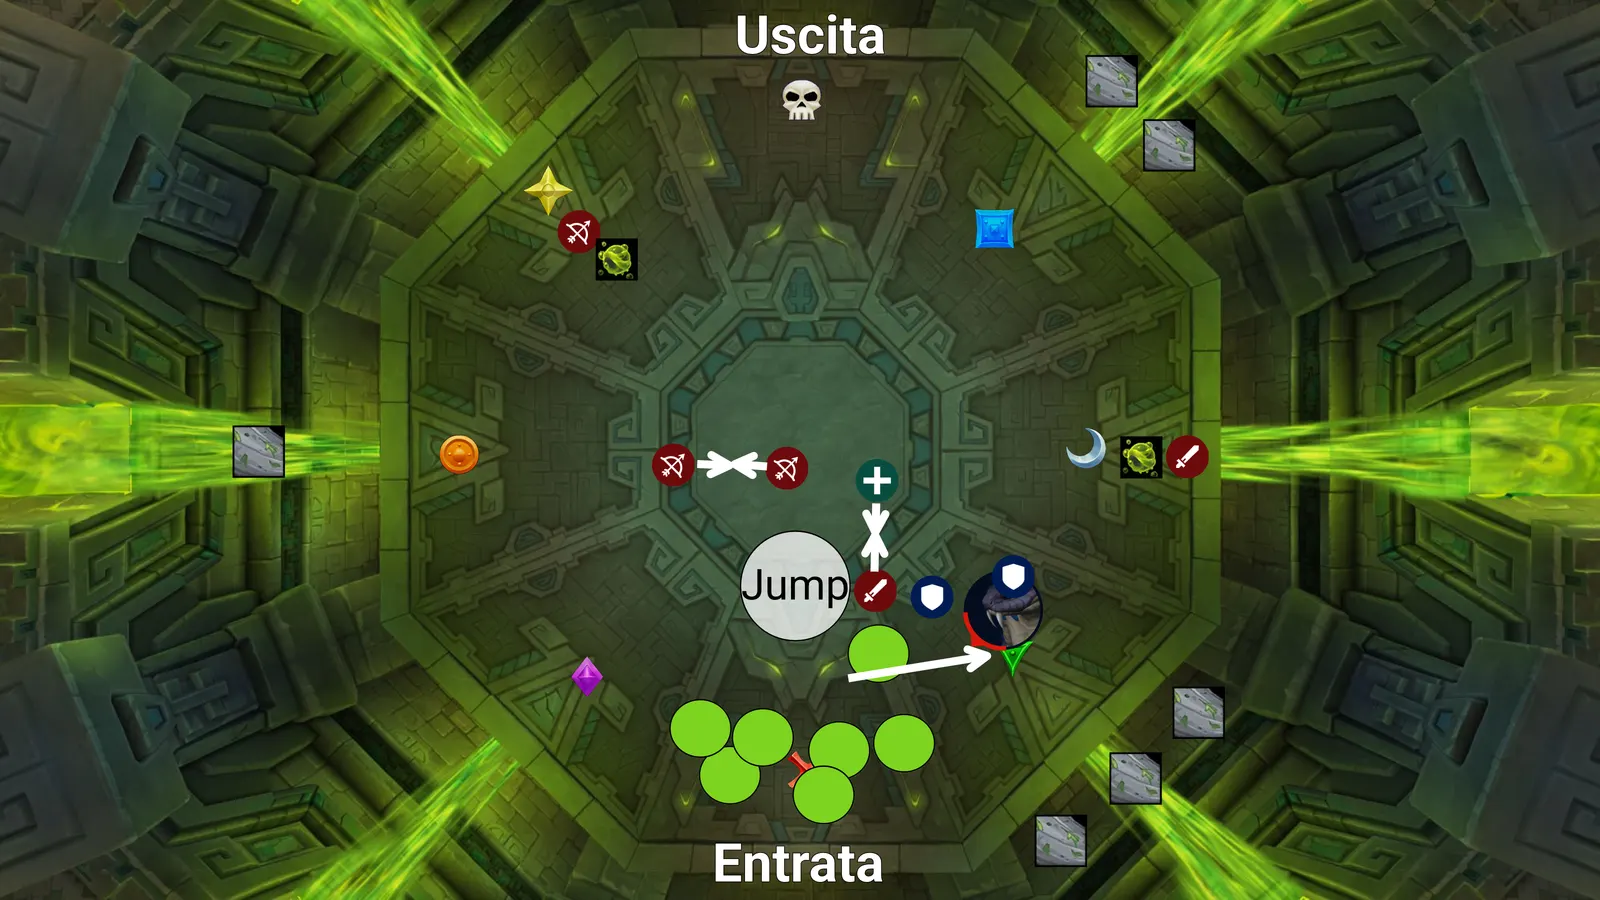
Each baiter has a fixed drop marker: in the diagram a ranged player takes their toxin to the Star (north-west) and a melee to the Moon (east). Positions must be adapted to the pushback order read on pull.
The Jump circle marks where a toxin detonation is used to reposition quickly.
The same diagram also shows the Raging Crosswinds pairings, described below.
Intermission —  Howling Maelstrom
Around 1:45 Sszorak collapses and the Altar of the Six Winds unleashes a succession of gales pushing players in the indicated direction. At the same time the boss uses Dig In: it anchors itself and takes +30% damage.
1:45 → Dig In
 ├─ 1st pushback → trigger the matching toxin
 ├─ 2nd pushback → second toxin
 └─ 3rd pushback → third toxin
End → detonate the spare toxin
Dig In is described as 25 seconds, while in PTR testing the usable window was around 20. Plan cooldowns for 20.
The tank combo —  Apex Predator
Sszorak alternates two frontals and the tanks cannot take the same ability twice in a row.
| Ability | Colour | Type | Handling |
|---|---|---|---|
| Ravage | Blue | Physical, frontal cone | Tank only. Hits everyone in the cone and grants +600% Ravage damage taken per stack |
 Mutilate Mutilate | Green | Nature, frontal cone | Soak with at least 5 players. Below 5 it deals lethal damage |
Players struck by Mutilate get Mutilated Gash: a heavy DoT and +500% Mutilate damage taken. Two alternating groups are therefore required, and it's the tank who turns toward the matching group.
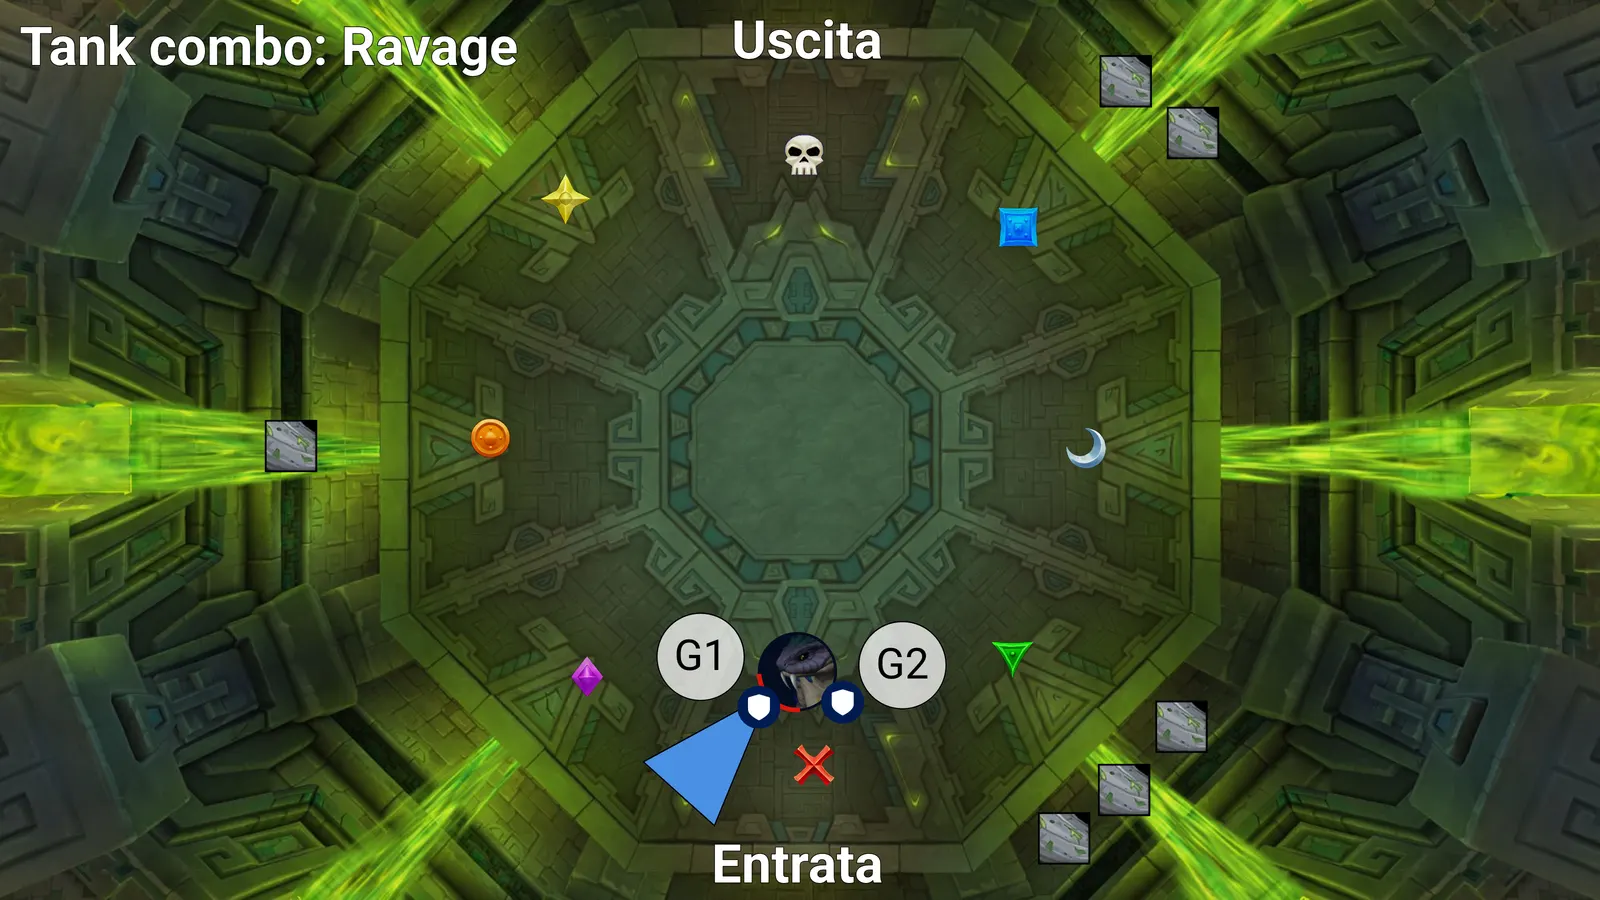
The Ravage cone is aimed south-west, toward the entrance, into the empty space behind the boss. G1 and G2 stay in place.
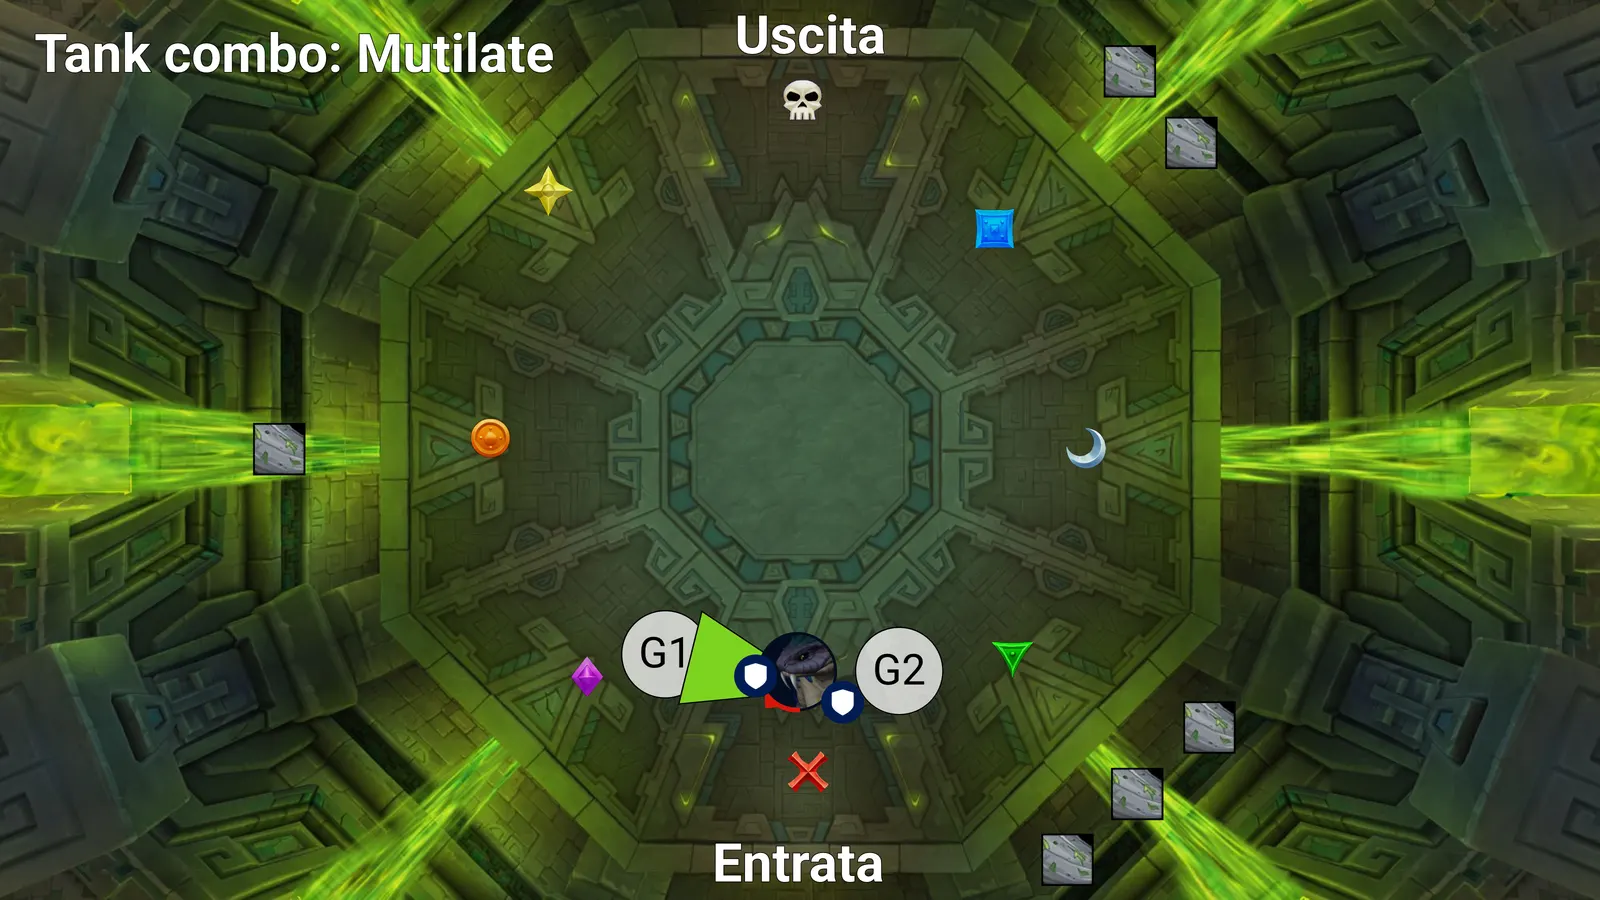
The Mutilate cone is aimed at the group due to soak: in the diagram it's pointed at G1, to the west.
Tempest
At any moment Sszorak can interrupt the combo to generate poison wind vortices that spiral around the arena, bouncing. Anyone struck takes damage and −30% movement speed, stacking.
They accelerate when they hit the edge: don't calculate trajectories from their pre-bounce speed.
Raging Crosswinds
Several players are imbued with winds and show a directional arrow. On expiry: damage within 6 yards, then the player is knocked in the indicated direction and receives  Turbulent Gusts, which suspends them and slows their fall.
Two players with opposite directions must be close together: contact dissipates the winds and cancels the knock.
Blink, Demonic Gateway and any movement ability help reach your partner. Immobile classes must be paired with someone who can fetch them via Rescue or equivalent, decided before the pull.
In the toxin diagram above, pairs meet on fixed axes: two ranged on the horizontal axis mid-arena, a healer and a melee on the vertical axis. Assigning pairs in advance prevents anyone being left without a partner.
Background mechanics
- Corroding Venom — melee attacks increase physical damage taken by 3% per stack. Tank swap on the combo.
 Caustic Claws (Heroic/Mythic) — splashes dealing damage within 6 yards that leave Caustic Residue: pools granting +30% damage taken.
- Ula'tek's Presence — raid damage every 2 seconds for the entire fight.
Layout and strategic choices
Setup: one group left and one right for the Mutilate alternation, rage reset toward the center, toxins deposited on world markers called by voice based on the order read at pull. Once a sector is fouled by cysts and residue, the boss is moved in an agreed direction — in our plan, counter-clockwise rotation.
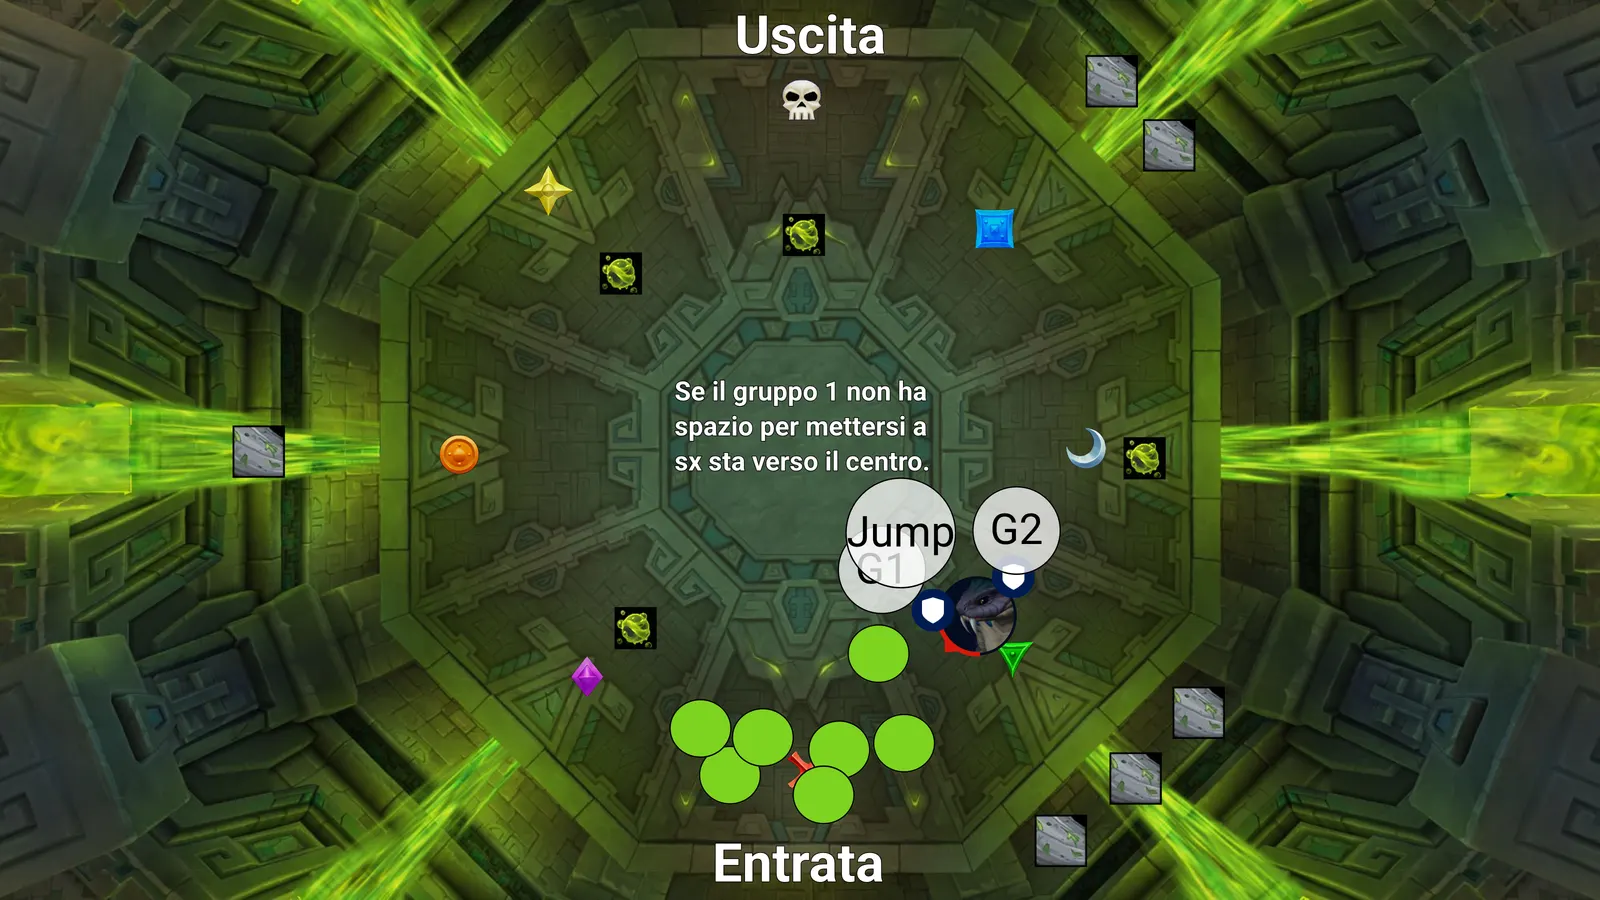
As the southern sector fills with cysts and residue, the boss is moved toward the Triangle (south-east) and the groups follow. Note on the diagram: if G1 has no room to position on the left, it moves toward the center.
There are two approaches to the end of the cycle:
| Approach | How | Pros | Cons |
|---|---|---|---|
| Reset first | Reset rage right after the tank combo, without waiting for toxins | No mechanic overlap | The room is fouled less predictably |
| Bait first | Bait the toxins first, then reset | Better arena control | Toxins and spread overlap, harder to read for the marked player |
Adopted: bait first. The marked player must be warned they'll have two things to read at once.
Assignment checklist
- Who carries the Serpent's Fury mark and how they position on pull.
- Who counts and calls the vortices.
- Gathering point for the rage reset.
- Toxin baiters and destination markers for each pushback.
- Left and right groups for the Mutilates.
- Fixed pairs for Raging Crosswinds, with Rescue or Gateway for immobile roles.
- Tank rotation on the combo.
- DPS cooldowns and Bloodlust on Dig In.
- Boss rotation direction.
Loot
| Difficulty | Item Level | Currency |
|---|---|---|
| LFR | 285 (Veteran 3/6) |  Veteran Mistcrest Veteran Mistcrest |
| Normal | 298 (Champion 3/6) |  Champion Mistcrest Champion Mistcrest |
| Heroic | 311 (Hero 3/6) |  Hero Mistcrest Hero Mistcrest |
| Mythic | 324 (Myth 3/6) |  Myth Mistcrest Myth Mistcrest |
LEGS tier set token:
 Venomwoven Relic — Cloth
 Venomcured Relic — Leather
 Venomcast Relic — Mail
 Venomforged Relic — Plate
Other notable drops:  Sszorak's Ferocity and
  Idol of the Howling Nexus (trinkets),
  Venomous Boneglaive (warglaive),
  Ruthless Slaughtergrips. Player housing decor can also drop.
Achievement:  Mythic: Sszorak ·
  Jumping Through Hoops
Guild guide. Data verified on Wowhead. Analysis based on PTR testing on Mythic, comparing two POVs.
Did this guide help?
One click tells us it is worth writing more of them.