
Three phases with an intermission between the second and the third. Phase 1 is Zul'jan, phase 2 is the spirit of Hex Lord Malacrass possessing him, phase 3 is both with mechanics combined. Transitions are health-based: phase 2 starts when Zul'jan reaches 0% and the intermission when Malacrass does.
In phase 1 the boss fills the arena with venom orbs that deal constant raid damage while they sit on the ground. They are picked up by walking over them, carried to the center and released there; the tank points his frontal at the drop point and destroys them. Each orb destroyed costs the raid a stacking DoT, so the amount cleared in one sweep has to be measured. In parallel comes Guillotine, a group soak that leaves those struck with a roughly hundred-second debuff and forces the raid to relocate from one side of the arena to the other each time.
In phase 2 Malacrass possesses several players, who walk toward the edge to jump off and must be freed by breaking their absorb. Each possessed player releases spirits that fixate a target and only approach while that target isn't looking at them; they are removed by walking them onto an assigned marker where the tank points his frontal. The boss also shields himself, and that shield must be broken in order to interrupt a cast that otherwise wipes the raid.
The intermission is a burst window. Malacrass becomes untouchable while Zul'jan heals himself but takes double damage, and meanwhile soul fragments race toward Malacrass: they must be soaked, but each soak raises the cost of the next, so the cadence has to be controlled.
In phase 3 orbs and spirits return together, with the simplification that a single frontal removes both. The two targets must be brought to matching percentages and killed almost simultaneously, or the survivor berserks.
The positioning rule that holds everything together: in phases 1 and 3 the raid plays toward the outside and mechanics are resolved at the center; in phase 2 this inverts, raid at the center and mechanics resolved outside.
TL;DR
What to do
Everyone
- Phase 1 and 3: pick up the Coalesced Venoms by walking over them and drop them at the center.
- Phase 1 and 3: soak Guillotine with at least 5 players, then move out of the circle.
- Phase 2: break the Dreadmarch absorb before the possessed player jumps off.
- Phase 2: if a Manifestation of Dread fixates you, looking at it stops it. Walk it to the assigned marker, then turn around.
- Phase 2 and 3: collect your Soul Fragments when Gravebound, within 10 seconds.
- Intermission: soak the Fragments of Malacrass, but on a spaced-out cadence.
Tank
- Phase 1 and 3: keep Zul'jan facing the center so Sever destroys the venom orbs.
- Phase 2: keep Malacrass facing the spirit marker so Soul Sever destroys them.
- Tank swap at the end of each Sever.
Healer
- Phase 1 and 3: each orb destroyed generates a
 Venom Rupture, a stacking raid DoT. The cleanup pace must be matched to cooldowns.
 - Phase 1 and 3: the carriers take more damage and stay isolated: cover them with externals.
- Phase 2:
 Dreadful Presence is constant damage;
  Suffocating Darkness applies a cumulative healing absorb while the veil holds.
DPS
- Phase 2: break the
 Veil of Twilight and then interrupt
  Eternal Nightfall. Two-step sequence with an assigned kicker.
 - Phase 2: interrupt
 Wail of Terror on the Soulcoilers, preferably late in the cast since the add leaps when interrupted.
 - Intermission: Bloodlust and cooldowns on Zul'jan, who takes +100% damage.
- Phase 3: bring Zul'jan and Malacrass to matching percentages.
What can kill you
| Ability | When | How to avoid it |
|---|---|---|
Unresolved  Gravebound Gravebound | Phase 2 and 3 | Fragments vanish in 10 seconds: if the debuff expires without reclaiming them, the player dies |
 Dreadmarch Dreadmarch | Phase 2 and 3 | The possessed walks to the edge and jumps: the absorb must be broken in time |
 Guillotined Guillotined | Phase 1 and 3 | +500% damage taken for ~102 seconds: never two consecutive axes |
 Axegrinder Axegrinder | Phase 1 and 3 | Axes roam for 3 minutes, damage ignores armor |
 Widow's Kiss Widow's Kiss | After each Guillotine | The axe erupts creating the circle to move out of |
 Noxious Ground Noxious Ground | Phase 1 and 3 | Patches from the altar's maws that swell quickly |
| A Manifestation reaching its target | Phase 2 and 3 | It possesses them with Dreadmarch |
What wipes the raid
| Mistake | When | Consequence |
|---|---|---|
| Eternal Nightfall completed | Phase 2 and 3 | Devastating raid-wide attack |
| Guillotine with fewer than 5 players | Phase 1 and 3 |  Execution: huge damage on everyone Execution: huge damage on everyone |
| Too many Venom Ruptures at once | Phase 1 and 3 | The DoT stacks and becomes unmanageable |
| A Fragment reaching Zul'jan | Intermission | Heals him for 10% of maximum health |
| Fragment soaks spammed | Intermission |  Spirit Erasure stacks +20% damage taken Spirit Erasure stacks +20% damage taken |
| One of the two killed before the other | Phase 3 |  Soulbound: +500% damage and attack speed to the survivor Soulbound: +500% damage and attack speed to the survivor |
Timeline
| Point | Phase | What happens |
|---|---|---|
| Pull → Zul'jan at 0% | Phase 1, Serpent's Bargain (Zul'jan) | Venom orbs carried to the center plus the tank's Sever. Two Guillotines, moving from side to side |
| Zul'jan at 0% | Phase 2, Usurper's Reprisal (Malacrass) | Dreadmarch, Manifestation of Dread, Eternal Nightfall, Spiritcackle, Gloombomb |
| Malacrass at 0% | Intermission, The Claimed Vessel | Opening knockback. Only Zul'jan is attackable and takes +100% damage. Fragment of Malacrass soaks |
| Then → 0% | Phase 3, Coiled Union | Phases 1 and 2 combined. A single frontal, Blighted Sever, removes both orbs and spirits |
Transitions are health-based, not timed: phase 2 starts when Zul'jan reaches 0%, and the intermission when Malacrass does. When that happens therefore depends on raid damage, not on a timer.
On the phase change every orb still active on the ground explodes at once, so stop collecting shortly before. This can also be exploited: if the push is imminent, leave a batch of orbs on the ground, stack the raid and absorb the blast under raid cooldowns (Spirit Link, Anti-Magic Zone and the like) instead of spending a Sever clearing it.
Two-minute classes can re-use cooldowns in phase 2.
Was this summary useful?
Detail
Phase 1 — Serpent's Bargain
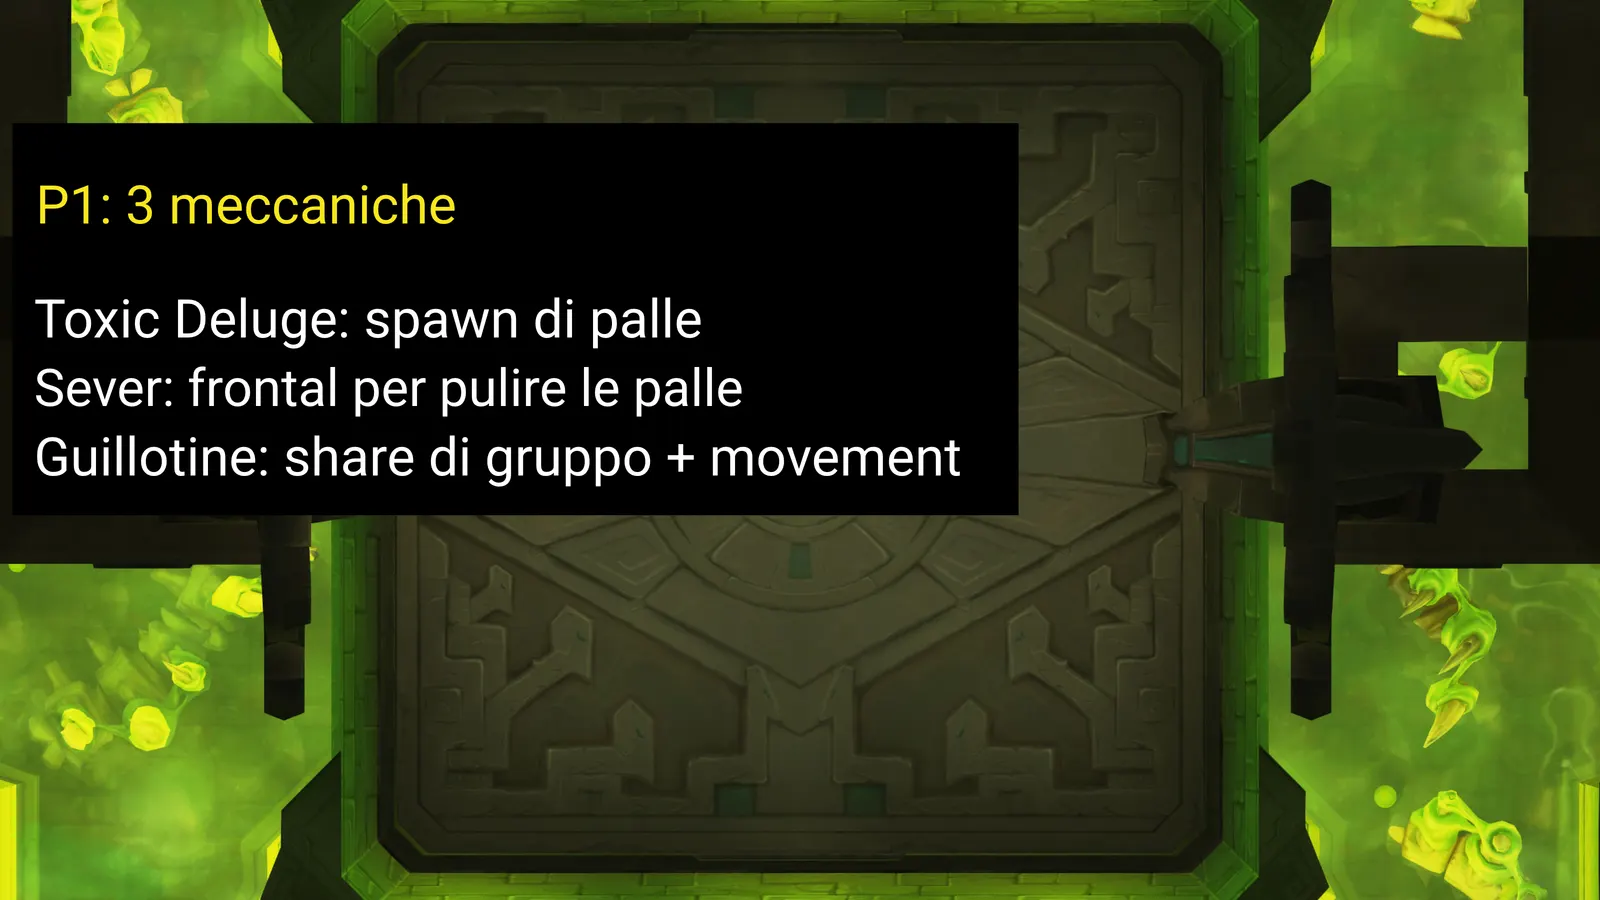
The phase has three mechanics: Toxic Deluge spawns the orbs, Sever is the frontal that clears them, Guillotine is a group soak that forces movement.
The venom orbs
 Toxic Deluge creates
  Coalesced Venoms around the arena. While they remain, they deal constant raid damage.
They are picked up by walking over them: the orb attaches to the player, who receives  Volatile Venom for 5 seconds, dealing damage within 5 yards. On expiry the orb is released at the player's position. It's transport, not removal.
 Sever, Zul'jan's frontal cleave on the tank, destroys the Coalesced Venoms it sweeps.
Toxic Deluge → orbs scattered
Carriers walk over them
They bring them to the center and release
The tank keeps Zul'jan facing the center
Sever → the orbs are destroyed
Each orb destroyed triggers a Venom Rupture: a 10-second raid DoT, stacking on Heroic. It's the built-in cost of the mechanic.
In PTR testing: 6 stacks were absorbed with no organisation or cooldowns; 9 stacks require a planned raid cooldown rotation. Clean up in blocks of about 6 rather than letting them pile up.
Orbs often spawn far from wherever the raid is standing. Carriers: ranged with high mobility, plus the off tank, who can take the extra damage. Since tanks swap at the end of each Sever, the off tank isn't always the same person.
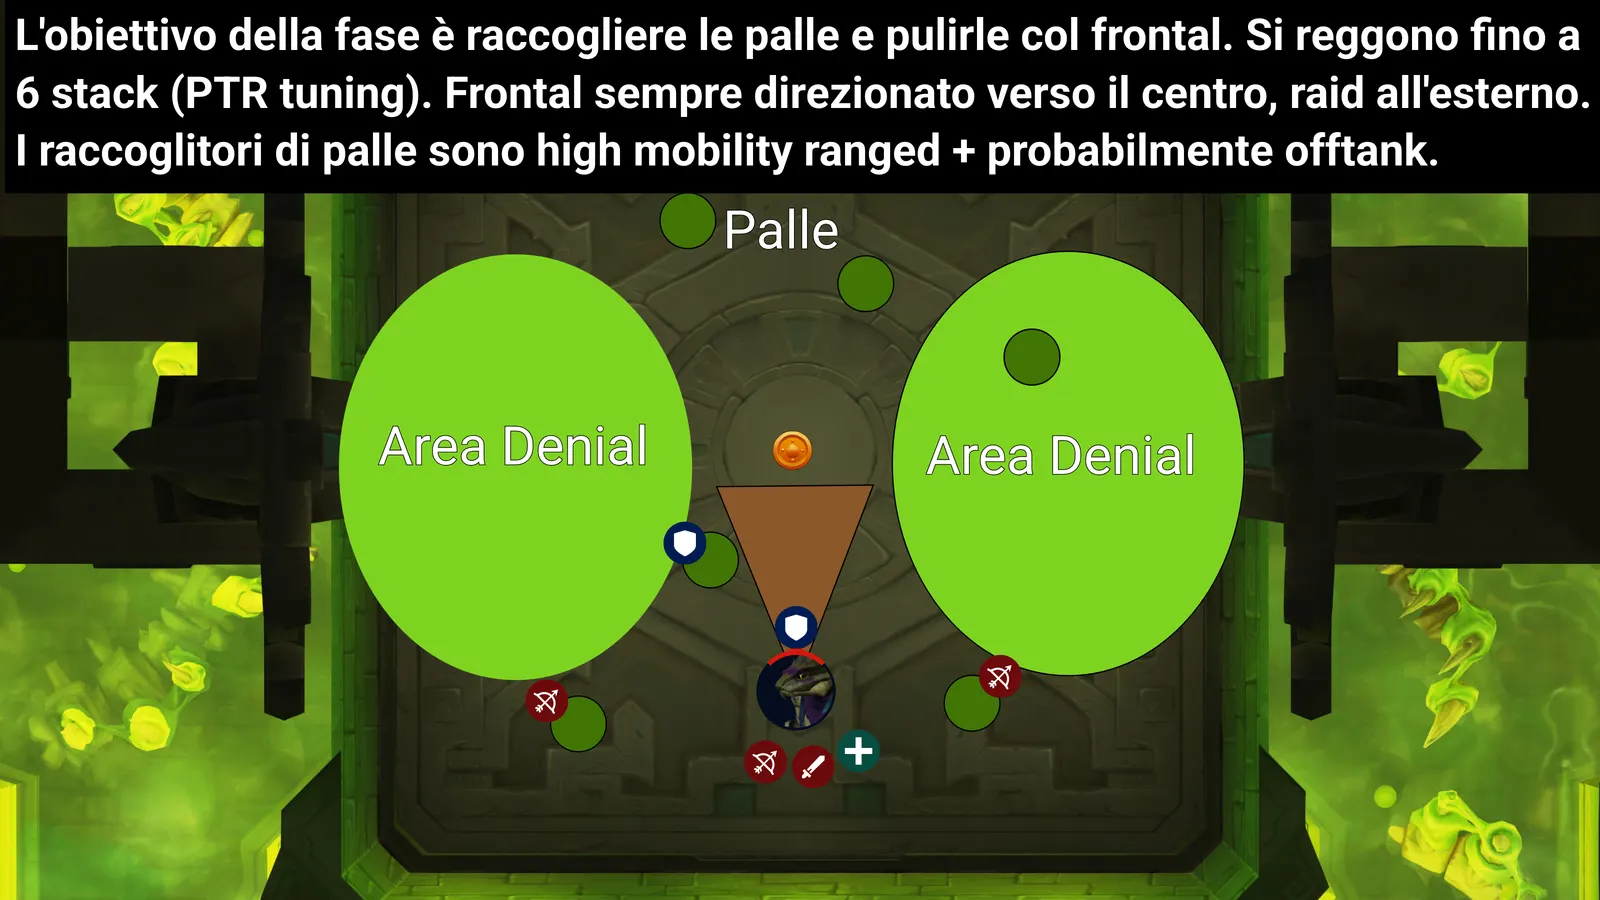
The two green ellipses on the diagram are the zones that become unusable over the course of the pull: that's where pools, residue and the Axegrinder axes end up, and the axes stay around for three minutes. So the raid doesn't stand there and doesn't bring orbs there: you work in the central band between the two, where the Sever cone sweeps.
The orbs, however, don't only spawn there: in the diagram they're scattered across the whole arena, including positions well to the rear. That's why it's worth dividing the arena among the carriers, giving each one a sector to pull from, rather than letting everyone take whichever is nearest — otherwise the ones at the back stay on the ground and keep dealing damage.
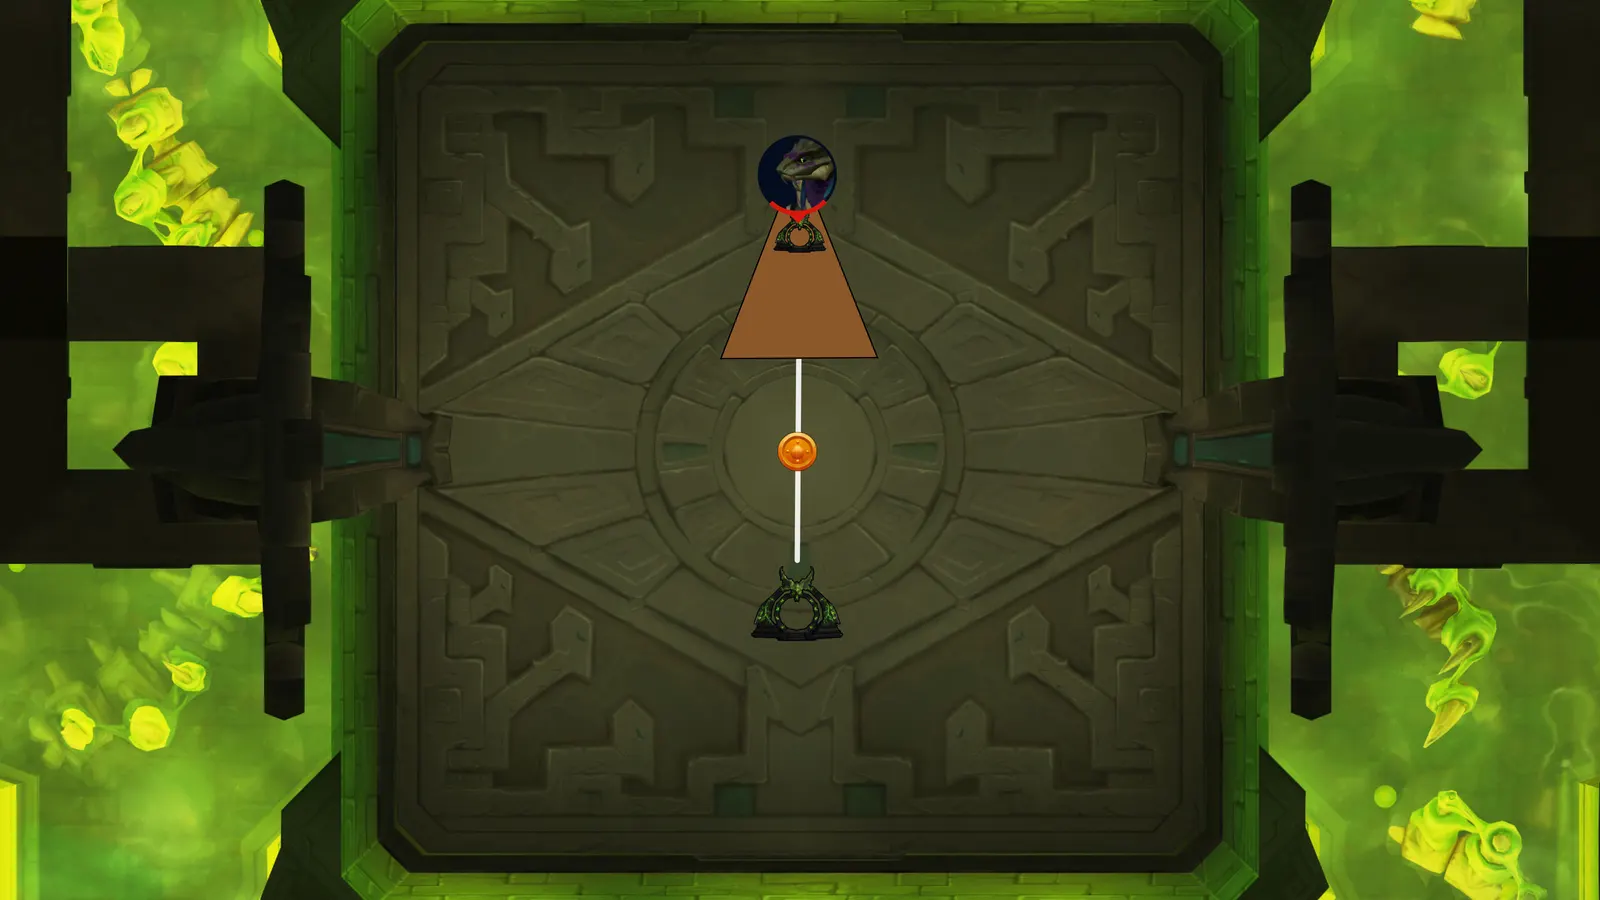
The boss is tanked on one of the two far sides of the room and turned inward: the Sever cone then sweeps through the center, where the marker serving as the drop point sits. The diagram also shows a Demonic Gateway placed on the opposite side, used for the bouncing described below.
The three-step cleanup loop:
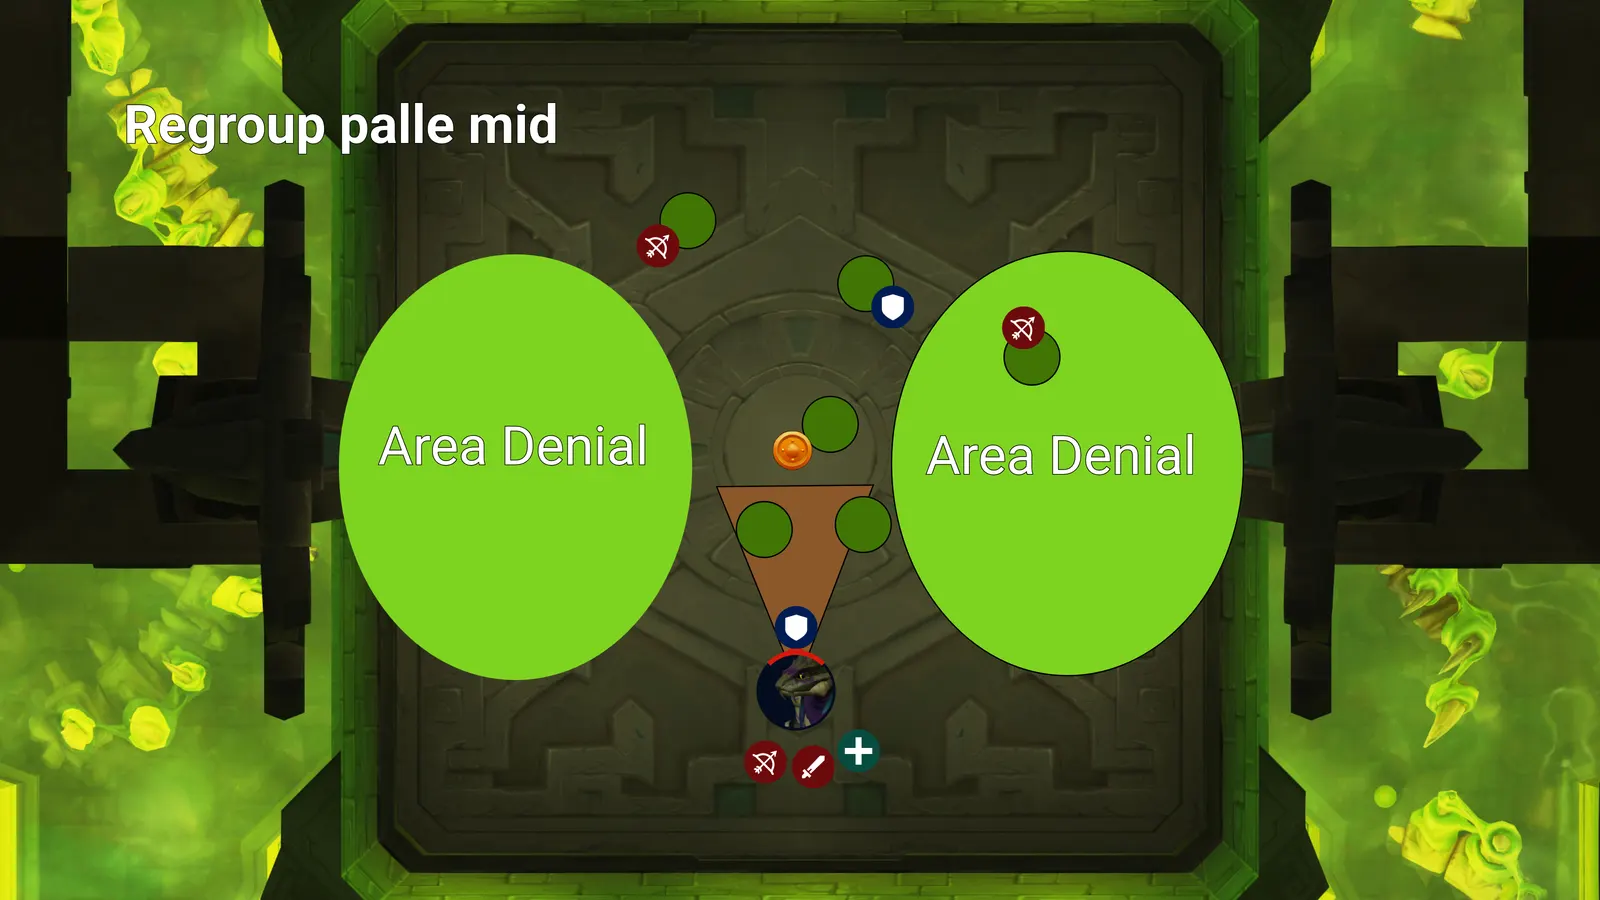
Regroup at the center. Carriers converge and release their orbs on the central marker, inside the area the cone will cover.
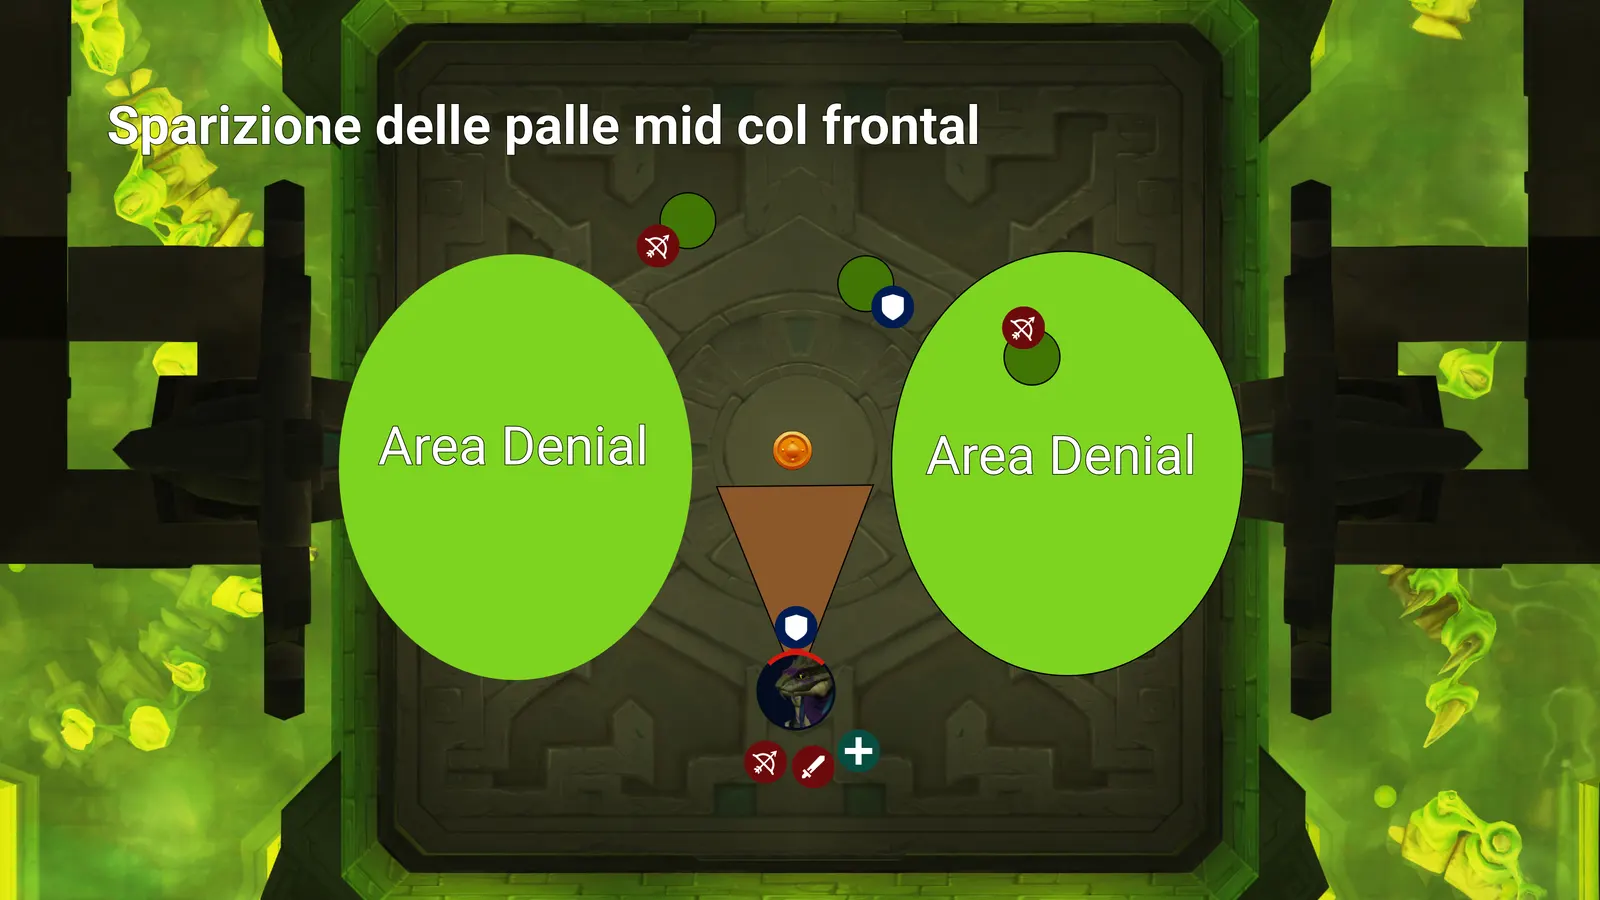
Clear with the frontal. The tank sweeps Sever across the orb cluster and they are destroyed in one go. This is when Venom Rupture stacks pile up, so the size of the batch should be calibrated around 6 stacks.
 Guillotine
Zul'jan hurls the axe at a player: damage split among players within 9 yards, so a group soak, and those struck receive Guillotined, +500% Guillotine damage taken.
If it strikes fewer than 5 players, the axe inflicts Execution on the whole raid.
After impact the axe erupts into Widow's Kiss, creating the circle to move out of. This is the phase's movement mechanic: after the soak everyone relocates to the other side of the arena.
The debuff lasts 1.7 minutes, roughly 102 seconds in phase 1 and 2 minutes in phase 3. Two alternating soak groups are therefore required. Phase 1 has two Guillotines: the first moves the raid across, the second brings it back, and the orb loop restarts from the new side.
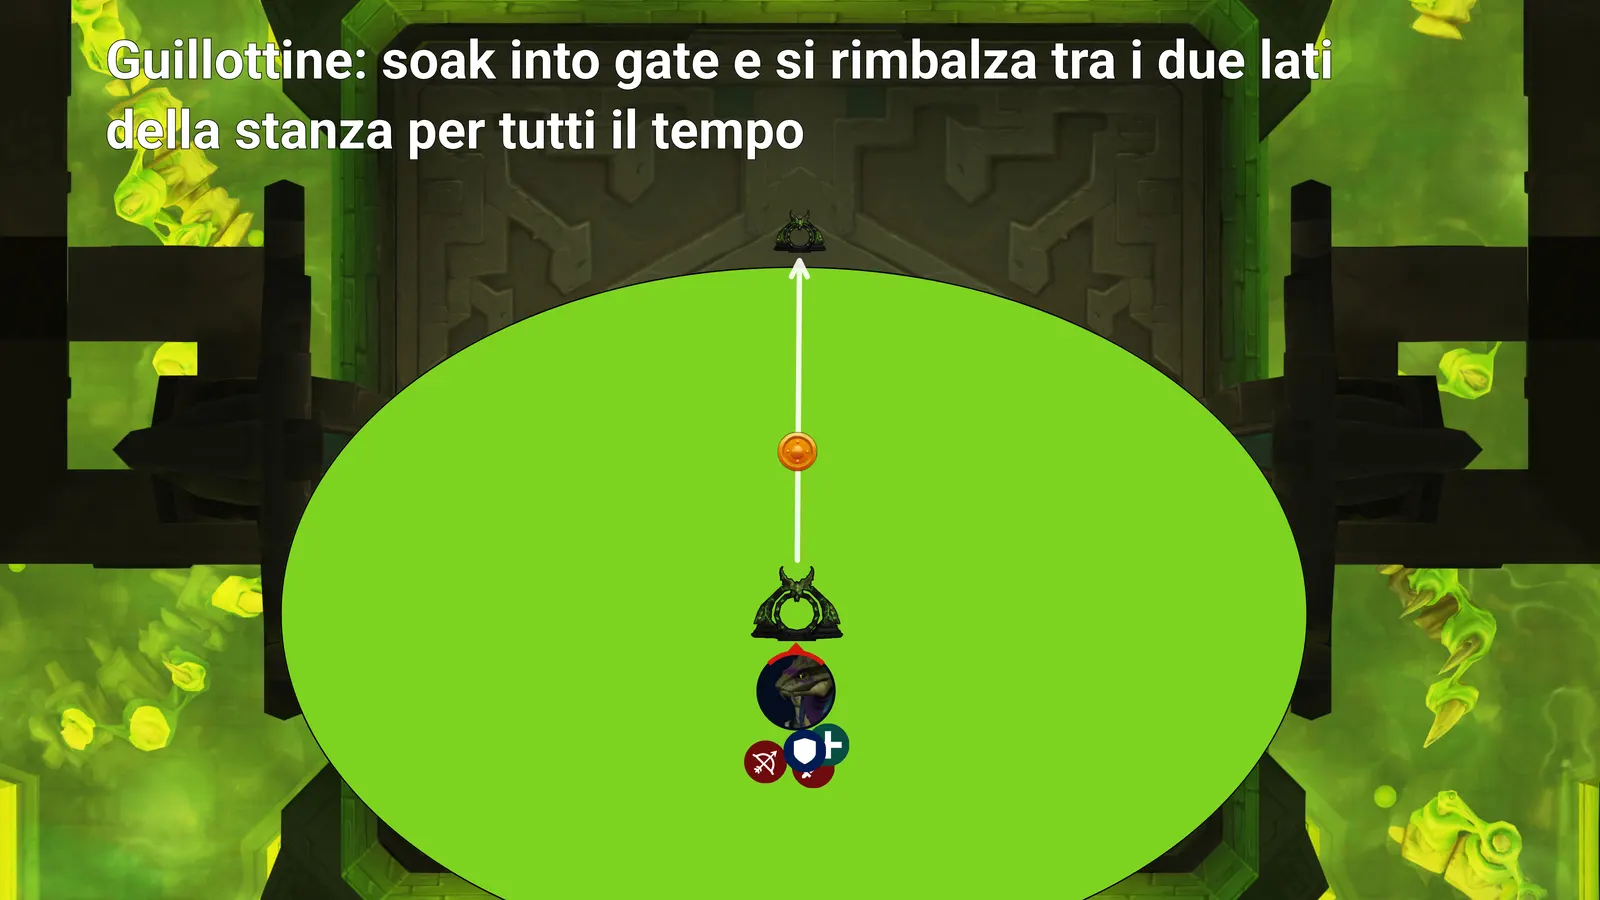
In the diagram the soak happens on top of a Demonic Gateway: as soon as the axe lands and the Widow's Kiss circle opens, the raid uses the gate to cross the room instead of running. The two gates stay planted on opposite sides and the raid bounces between them for the whole phase.
This makes a Warlock very useful in this fight, and the placement of the two gates has to be agreed in advance.
Zul'jan's other abilities
 Fangs of the Coiled Altar — raid damage and accumulation of
  Twinfang Toxin, consumed by his auto-attacks to dump extra damage on the tank. Simultaneously the altar's maws generate Noxious Ground. A predictable spike for healers.
 Venomfang — a poisoned axe thrown between several players, with a 14-second DoT.
- Axegrinder — axes dealing damage and knockback on impact, then roaming the arena for 3 minutes, ignoring armor. They accumulate and progressively crowd the arena.
Phase 2 — Usurper's Reprisal
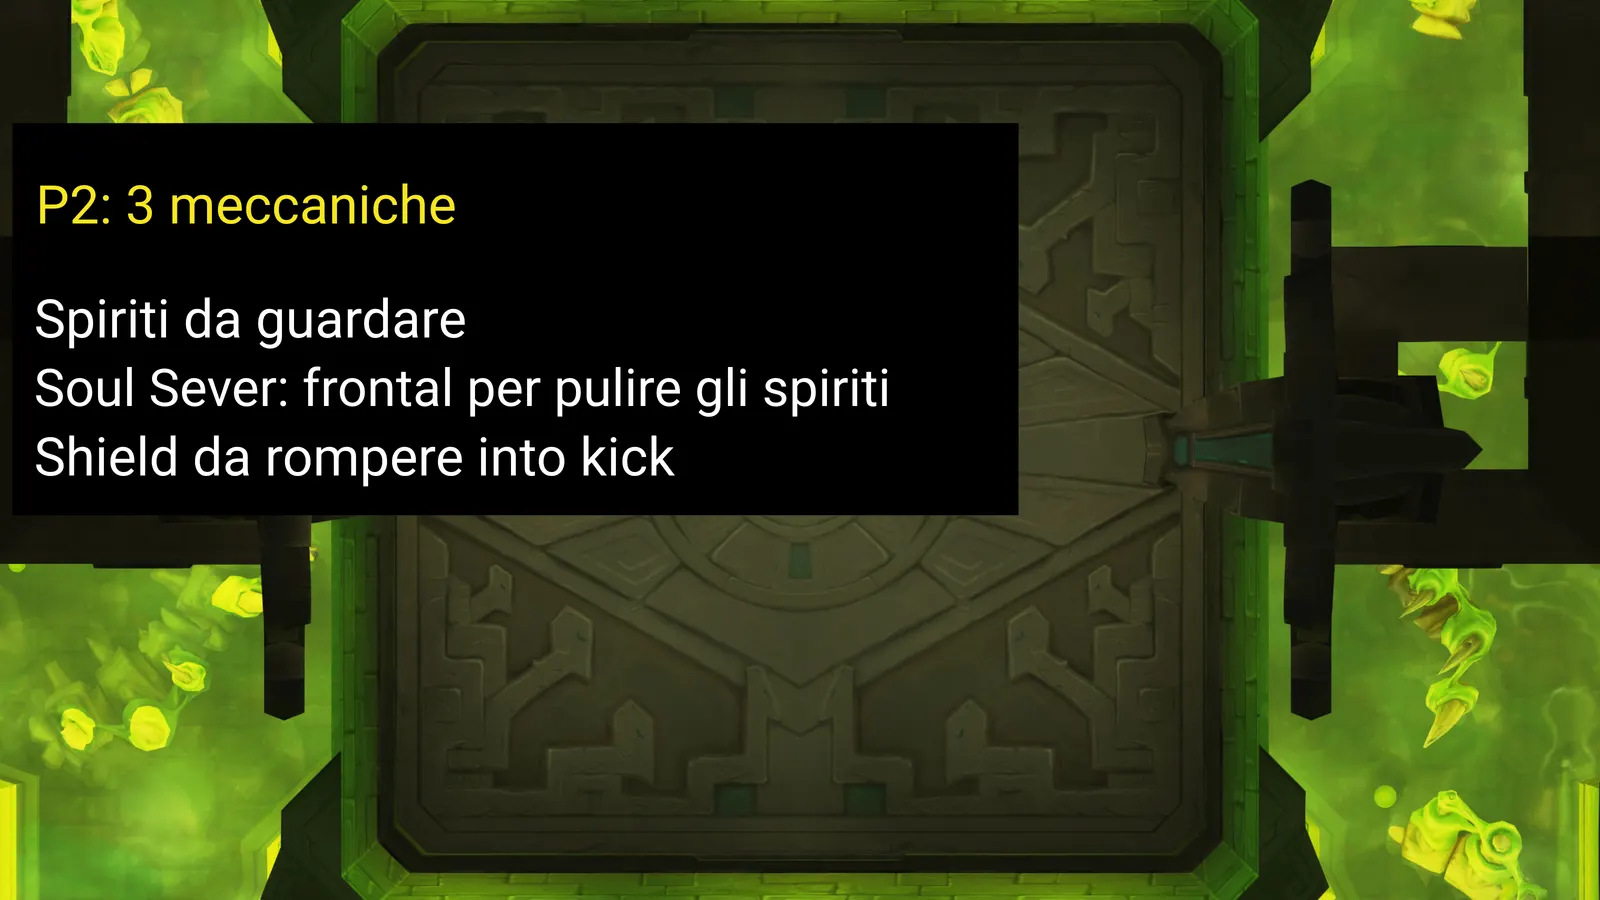
The three mechanics of the phase: the spirits to be watched, Soul Sever as the frontal that clears them, and the boss's shield to break in order to interrupt the cast.
The raid plays at the center because Dreadmarch victims run toward the edge, and staying central maximises the time available to save them. Spirits are therefore handled toward the outside.
Dreadmarch
Malacrass possesses several players at once, three in PTR testing. The possessed receive an absorb and walk toward the edge to jump off. They are freed by breaking the absorb.
On removal, each possessed player releases  Manifestations of Dread, two per player in testing, so six in total.
The spirits — Unnerving Fixation
Each Manifestation fixates a player and approaches only while that player isn't looking at it. If the target looks, it stops.
They don't attack or cast, but if they reach the target they possess them with Dreadmarch.
 Soul Sever, Malacrass's frontal cleave, destroys the Manifestations it sweeps. Spirits are therefore kited to an assigned marker and the tank keeps Malacrass facing that way when the cast comes. Anyone struck by Soul Sever receives Gravebound.
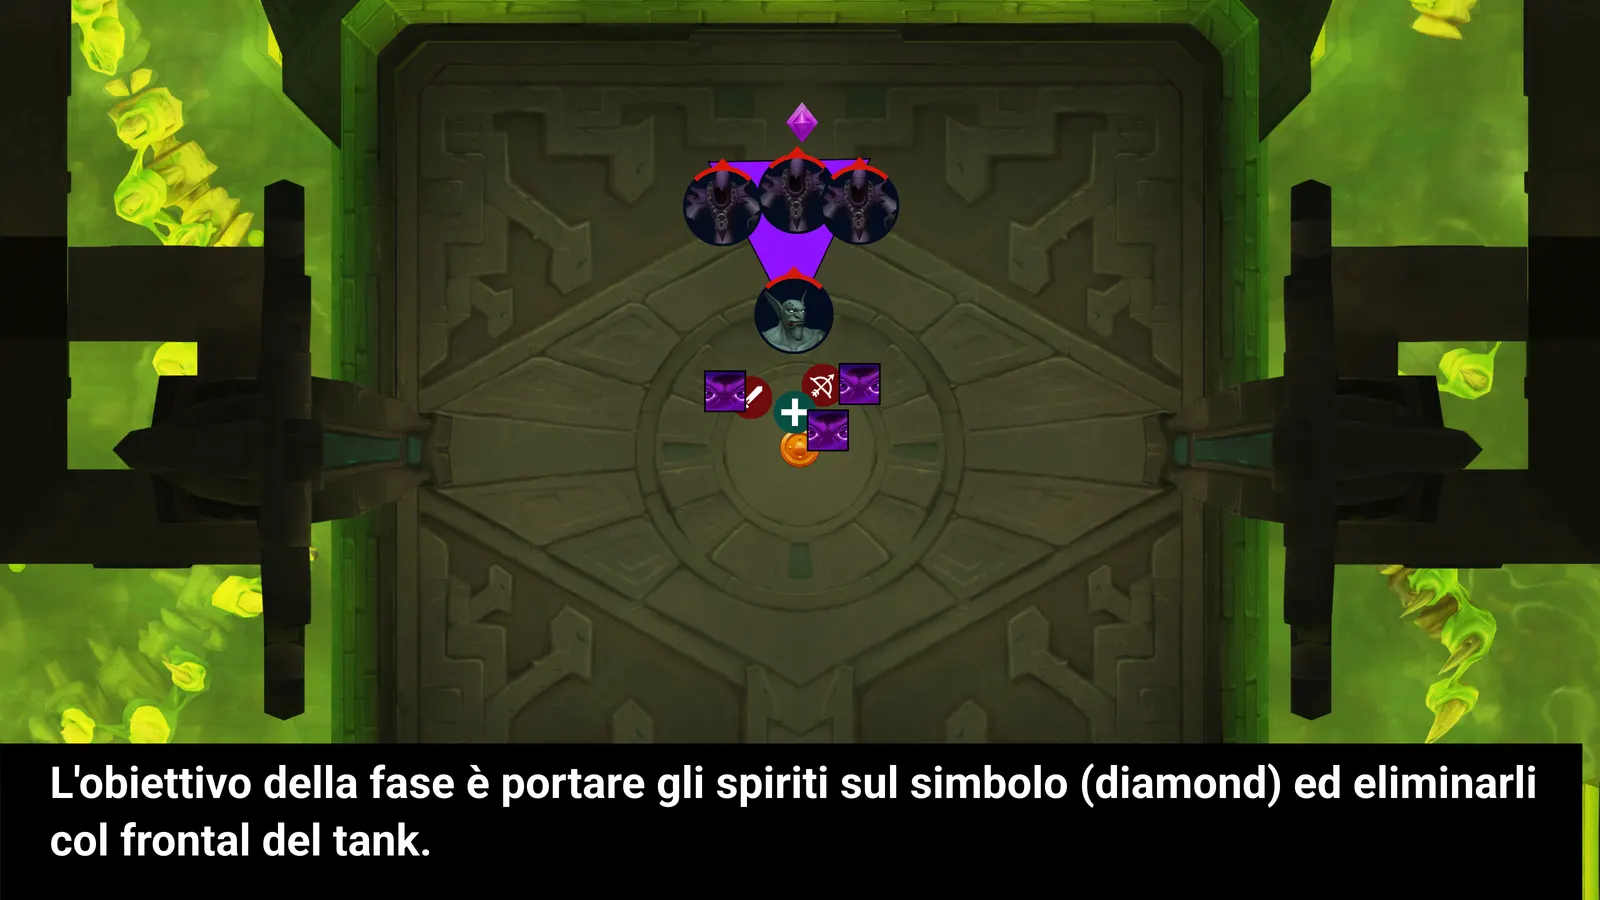
In the Raid Plan the rally marker is the Diamond, on the northern side. Spirits are walked there, the tank turns Malacrass toward them and the frontal clears them in one sweep. The rest of the raid stays stacked at the center, on the orange marker, where Dreadmarch victims have the longest distance to cover.
Gravebound
Applied by Soul Sever and Gloombomb. The player's soul is shattered and Soul Fragments emerge from their body, vanishing in 10 seconds. They must be walked over to reclaim: if the debuff expires first, the player dies.
Eternal Nightfall
Malacrass wraps himself in the Veil of Twilight and prepares a devastating raid-wide attack. While the veil holds he applies Suffocating Darkness, a cumulative healing absorb, to everyone.
Two-step sequence: destroy the veil, which absorbs a substantial amount of damage, then interrupt the cast, which only becomes interruptible afterward. An assigned kicker must be ready the moment the shield drops.
 Spiritcackle
Malacrass summons Soulcoilers. On Heroic the summon afflicts all players with Gravebound.
The spirits cast Wail of Terror, which fears the whole raid for 5 seconds and must be interrupted, and  Retaliatory Malice, dark energy volleys at random players.
When interrupted the add leaps. Interrupt it late in the cast: letting it cast longer means fewer interrupts overall and fewer leaps. It cannot be gripped.
 Gloombomb
Marks several players for 5 seconds; on expiry they explode, damaging anyone within 15 yards and applying Gravebound to those hit. Simple spread, easy to manage with the space at the center.
In the background, Dreadful Presence deals constant damage.
Intermission — The Claimed Vessel
When Malacrass reaches 0% a knockback fires.  Soulbinding binds his soul to Zul'jan:
- Zul'jan receives
 Ghastly Regeneration: healing for 2% of maximum health per second for 35 seconds, but taking +100% damage;
 - any healing he receives is duplicated onto Malacrass;
- Malacrass is protected by
 Deathguard, −99% damage taken.
Only Zul'jan is attacked, and at doubled damage this is the Bloodlust window.
The  Fragments of Malacrass break off Zul'jan and race toward Malacrass:
| If the fragment | Effect |
|---|---|
| Reaches Zul'jan | Heals him for 10% of maximum health |
| Is stepped on | Spirit Erasure: raid damage plus +20% Spirit Erasure damage taken for 2 seconds, cumulative |
They must be soaked but cannot be spammed: a controlled cadence is needed, with soaks spread over time and across different people.
In PTR testing the healing observed was around 3%, while the journal states 10%: the value likely changed in tuning.
The intermission doesn't clear prior mechanics: in testing the raid still carried phase 2 spirits and debuffs into it.
Phase 3 — Coiled Union
Both orbs and spirits return, all to be brought to the center. Positioning reverts to phase 1: raid outside, mechanics at the center.
 Blighted Sever, the shadow version of Zul'jan's cleave, destroys both Coalesced Venoms and Manifestations of Dread: a single frontal resolves both mechanics.
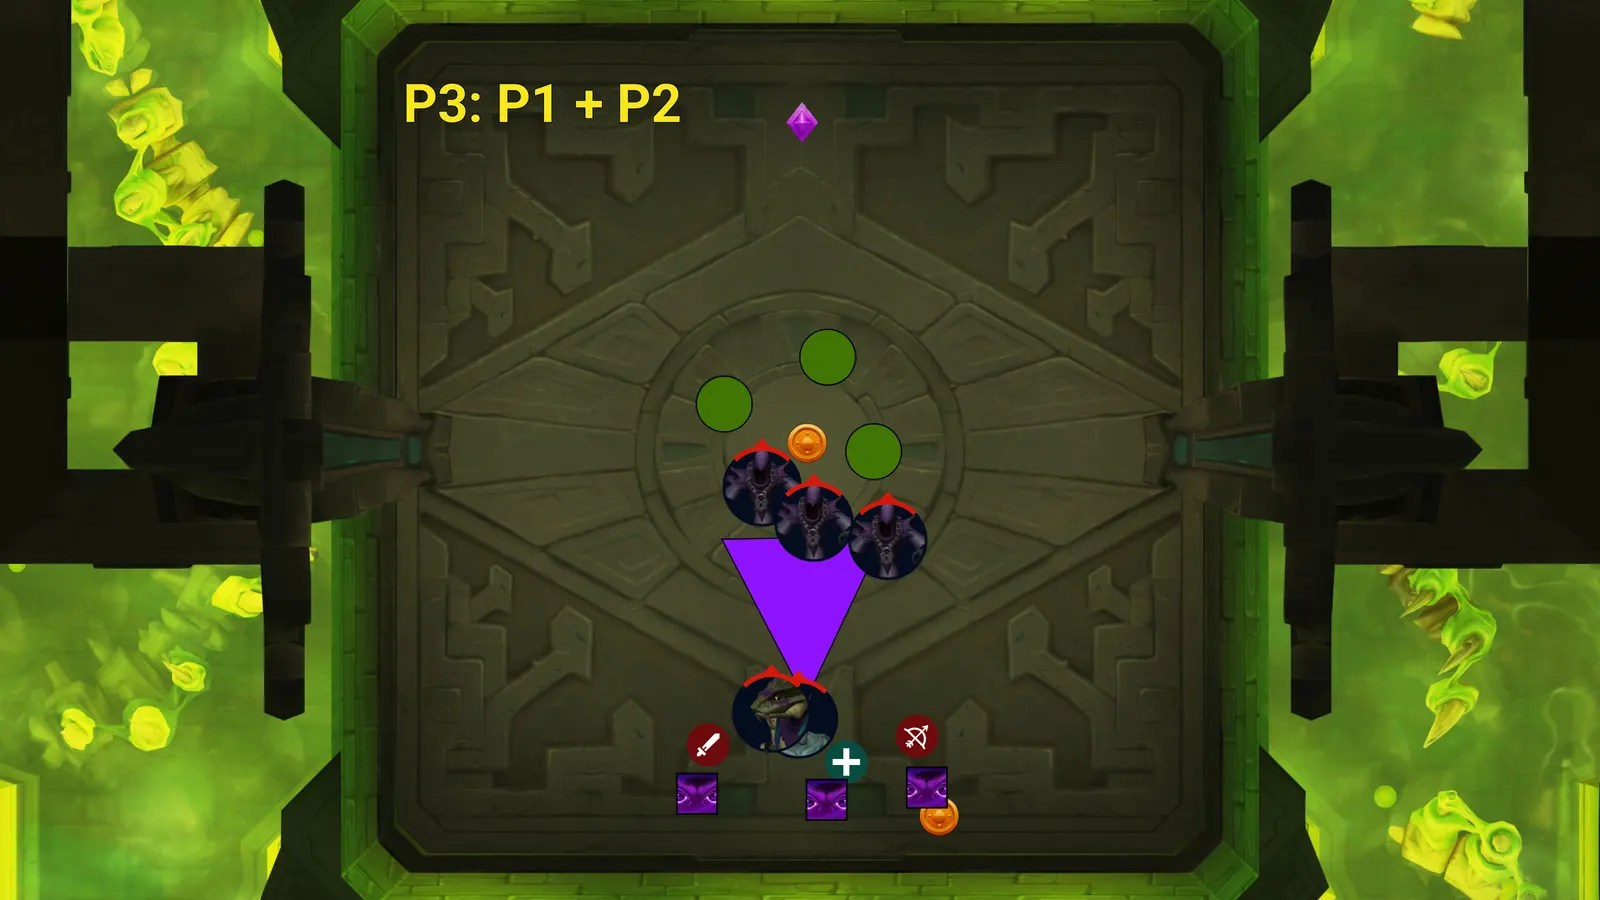
The diagram shows how the two mechanics fit together: spirits are gathered toward the Diamond and the orbs released just ahead of them, so a single frontal sweep covers both. The raid stays behind the boss with the possessed players to handle.
Empowered versions:
 Grim Guillotine — as Guillotine but Shadow damage, with a healing absorb and a 2-minute debuff.
 Defilement of the Coiled Altar — applies a healing absorb to the whole raid, stacks
  Corrupted Toxin on the tank and generates
  Defiled Ground, terrain that absorbs healing instead of dealing damage.
- Malacrass retains his full kit.
Soulbound: when one dies, the other berserks with +500% attack speed and damage. They must be brought to matching percentages and killed together.
The overlaps
PTR testing showed heavy overlaps. The worst is Dreadmarch plus Guillotine at the same time: the possessed run toward the edge while the raid must group up to soak the axe with at least 5 players.
The Death Knight grip works on mind-controlled players too, so they can be pulled back into the group instead of chased. It isn't clear whether cleaner alternatives exist.
Mythic additions
- Manifestations of Dread are visible only to the player they are fixating.
- They re-fixate a new target every 15 seconds.
 Malevolent Resonance — if two Manifestations touch, both deal heavy damage to their respective targets for 5 seconds.
- Interrupting Wail of Terror briefly reveals hidden Manifestations.
 Spirit Shield on the Soulcoilers: −99% damage taken, weakened by Gloombombs.
 Consumed by Resentment — at 100 energy the Soulcoilers become interrupt-immune.
 Virulent Mutation — some orbs mutate and, if they explode, chain-trigger 20 Venom Ruptures.
- Virulent Cyst — spits 2 new Coalesced Venoms every 6 seconds.
- Guillotined is permanent.
- Axegrinders no longer despawn.
Assignment checklist
- Orb carriers, with backups.
- Marked drop point at the center.
- Group 1 and Group 2 for the Guillotine alternation.
- Raid cooldowns for windows of roughly 9 Venom Rupture stacks.
- Who breaks Dreadmarch absorbs and in what priority.
- Rally marker for the Manifestations of Dread.
- Dedicated kicker for Eternal Nightfall.
- Interrupts on Wail of Terror, with the late-cast rule.
- Soak rotation for the Fragments of Malacrass.
- Bloodlust on the intermission.
- Death Knight grip assigned for the Dreadmarch and Guillotine overlap.
- Who monitors the health gap in phase 3.
Loot
| Difficulty | Item Level | Currency |
|---|---|---|
| LFR | 289 (Veteran 4/6) |  Veteran Mistcrest Veteran Mistcrest |
| Normal | 302 (Champion 4/6) |  Champion Mistcrest Champion Mistcrest |
| Heroic | 315 (Hero 4/6) |  Hero Mistcrest Hero Mistcrest |
| Mythic | 344 (equivalent to Myth 9) |  Myth Mistcrest Myth Mistcrest |
Along with Ula'tek, this is one of the two bosses dropping 344 on Mythic, well above the rest of the raid.
No tier set token.
Very Rare weapons, both cantrip with additional  Venomfang damage:
 Aman'muso, Warlord's Vengeance — 1H Axe
 Maze-roa, Warlord's Fury — 2H Axe
Other notable drops:  Hex Lord's Dooming Idol and
  Zul'jin's Guillotine Technique (trinkets),
  Baleful Hexblade,
  Silken Voodoo Drape.
Transmog:  Hex Lord's Visage at all difficulties,
  Hex Lord's Gaze on Mythic only.
Achievement:  Mythic: The Coiled Altar ·
  Watch Out Behind You
Guild guide. Data verified on Wowhead. Analysis based on PTR testing on Heroic and a reading of the dungeon journal. Detailed positioning is in the internal Raid Plan.
Did this guide help?
One click tells us it is worth writing more of them.